Phase inversion takes a signal and flips it upside down . Most people are introduced to it as a button you push in a DAW while troubleshooting phase problems, but with some thinking it’s capable of a lot more than that. Some digging in the audio DSP literature will uncover a stray sentence or two that acknowledges this, but I get the impression that it strikes the people who already know it as too obvious to be worth mentioning. The really nice thing about it is that it all works in a DAW–you don’t need to break out Max/MSP or Reaktor to experiment with it.
I’m pretty sure I originally got the basic idea for all this from vladg/sound.
My intuition for this is fairly algebraic so I’ll be leaning on that a little, but all you need to have is an intuition for what is happening when you route audio around in a DAW. That said, I will be using notation from digital signal processing that’s too useful to give up:x[n]reads as thenth sample of a signalx. Thenc[n] = a[n] + b[n]describescby telling you how to compute thenth sample ofcin terms of signalsaandb. We could drop the[n], but this makes clear that we don’t need to know anything aboutaorbother than theirnth samples to compute thenth sample ofc. For anything more complicated than this, I’ll use graphics.
Diffing
Phase inversion negates a signal, y[n] = -x[n], so it turns addition (mixing) into subtraction.
+ = = -
The first thing to notice about this is if we add a signal to itself, phase inverted, we get silence.
+ =
There is a vocals isolation trick that relies on this. That’s not what this post is about.
What we’re interested in is signals before and after applying an audio effect. Some audio plugins have this built-in; Ableton’s EQ8 allows you to listen to each equaliser band in isolation. You could always do this yourself by flipping the phase of the equalised signal and mixing it back in with the original. Doing so in a DAW can be cumbersome, so when plugins do it for you, it can be very nice if this is all you want. But there is nothing stopping you taking the difference of a whole chain of effects, and you have to do it yourself for plugins that don’t have this feature.
But there’s a consequence to this that is not obvious. We can add the difference signal to the dry signal to recreate the wet signal. Algebraically, b[n] = a[n] + (b[n] - a[n]). This is what this post is about. Whenever we have an effect in a signal chain, we can interpret the effect as mixing in a difference signal to change the dry audio to the wet audio, and we are free to do any processing we want on the difference signal. Now, this is an interpretation, and it’s a wrong one. But we can have some fun with it.
By the way, I’m trying to keep this post DAW-agnostic but at the end I describe how I do this in Ableton Live in a self-contained way that doesn’t involve six hundred sends. So, check that out if you’re confused how to actually do this in a DAW.
Dry/Wet Mixing
The simplest thing we can do with the difference signal idea is to implement dry/wet mixing. This is less useful for single effects, which have this built in, than it is for effect chains, which don’t.
This is easy: turn the gain down on the difference signal. This will fade between from the wet to the dry signal. But if you’re willing to deal with a little algebra I think it’s worth exploring to what extent this is really dry/wet mixing, or something else. In dry/wet mixing, we mix two signals in such a way that the net gain sums to one,
c[n] = g*a[n] + (1 - g)*b[n],
where g fades between a when g is 0 (-∞ dB) and b when g is 1 (0 dB). By multiplying out and regathering we get
c[n] = b[n] + g*(a[n] - b[n])
so a dry/wet mix knob is directly equivalent to mixing in the difference signal. Note that a and b have swapped around; the phase of the difference signal has been inverted. In practice, you get to choose which way you want, which I’ll touch on later.
This is no big deal. Putting an effect chain on a return track and balancing it with the source track will be easiser most of the time.
Filters
This is well known among DSP people. A highpass filter can be made from a lowpass filter by subtracting the filtered signal from the original: hp[n] = x[n] - lp[n]. It works the other way around, too, and with bandpass filters. If you think about this for a moment this is kind of obvious but may be surprising. If a lowpass filter removes high frequencies, then whatever is left are low frequencies, and subtracting those from the original signal will get rid of those low frequencies. But our differencing operation operates on single samples from each signal–independent of any samples before or after–and a single sample is just a number without any frequency information. So, given a lowpass filter, there is some highpass filter for which we can know the value of hp[n] knowing only the two samples x[n] and lp[n]. Showing why this works mathematically isn’t hard1 but something cool is happening here and I think it would be a mistake to dismiss it as obvious.
With a little tinkering we can start making bandpass and bandstop filters the same way, and go on to shelving and bell filters. But all we’ve done so far is recreate things we can already do, and I want to get to the good stuff.
Multiband Compression
The reason why you’d want to use the filters described above is that we can recover the original signal exactly by mixing them together again: x[n] = lp[n] + hp[n]. We don’t have to think about how we parameterise the filters or anything because we’ve used our phase inversion trick to make one filter from the other. Now all that is left is to compress just one of those filtered signals, do the sum, and we have a multiband compressor. Building this out in a DAW can be tricky but, to be clear here, it lets you combine any set of filter plugins and any set of compressor plugins into a multiband compressor. That includes parametric equalisers, and doesn’t have the weird overlapping spectrums that throwing bandpass filters around everywhere does.2
To do this, you need to remove the frequencies you want to compress, compress the difference signal, then add it back to the filtered signal. Before, we were adding the difference signal to the dry signal. Now, we’re adding the processed difference signal to the wet signal. We could have used the dry signal; we have a choice here between a[n] + compress(b - a)[n] and b[n] + compress(a - b)[n]. For compression, I find the latter much easier to reason about. The opposite way still works, but you’re adding in a phase-inverted copy of compressed frequencies to the dry signal. I have no intuition for that.
Compressors
The above has a degree of conceptual elegance, which we’ll now dispense with. Let’s take the signal
and use a compressor to flatten its peaks.
This sounds dreadful, but we can subtract it from the original signal to produce
which gives the peaks, and we can do whatever we want with them. But the isolation isn’t perfect. The decaying tone causes the compressor to dampen the signal more when the tone is loud, and some of the tone ends up in the peaks signal. What we care about is that they sum exactly to the original signal, and we can now process them independently.
Saturators
Applying a saturator to the difference signal of a saturator reduces the amount of distortion. The simplest saturator is the hard-clip , and the difference signal of this is also a saturator, . If we hard-clip this curve, we get , and adding this to the original signal produces the saturator curve . This saturator doesn’t clip very quiet or very loud signal values, only those somewhere inbetween.
One of the nice things about this is that good saturators have good anti-aliasing, and so will any curves you make this way.
Less esoterically, think of saturation as adding harmonic content. Taking the difference isolates the added harmonics, and you can apply EQ to them.
Another option is to EQ before saturating, take the difference between the EQ’d and saturated signals, then add that back to the original signal. Now you have a saturator that responds differently to certain frequencies. Mixing linear and non-linear effects this way will mess with any intuition you have for them–don’t think you’re being scientific when you do this.
Bit-depth Reduction
You can think of bit-depth reduction as an extreme saturation curve,
. This particular curve reduces a signal to 3 bits of dynamic range: 000, 001, 010, 011, 100, 101, 110, and 111. The entire dynamic range is mapped to these 8 values, so there are 8 steps. Its difference signal is
.
There are two ways to interpret it. One is that it’s wraparound distortion (see the pong~ object in Max/MSP). Another is that it’s giving you back the bits the other curve throws away. Either way, I like experimenting with this. I’m one of those unfortunate people who likes the sound of bit crushing, and you can use this to get a lot more variation (and dynamic range) out of it.
Doing It
The best way of actually doing this took me a while to figure out. I use Ableton Live, which has audio effect racks. They are almost enough to do everything we want to do, but if you’re using a DAW that instead relies on complex routing, it might be too unwieldly to use in practice. I’ve settled on using two audio effect racks, one for the a[n] + (b[n] - a[n]) case, and another for the b[n] + (a[n] - b[n]) case, which I call positive and negative.
The positive case is easiest, because a[n] is the original dry signal, and we can duplicate it as needed by adding more chains to an audio effect rack.
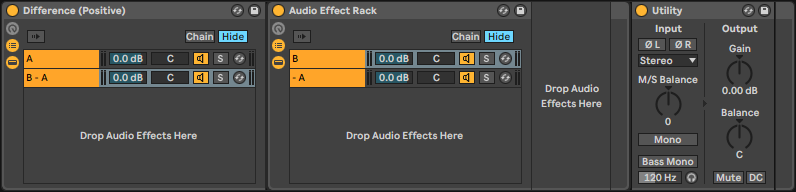
The outer A chain is empty. The inner -A chain contains a utility effect with both channels inverted. Then, you place any effect you want the difference signal of in the B chain, and can process the difference signal after the inner audio effect rack. The utility effects gain knob acts as a dry/wet mix; the effect is 100% wet at 0 dB.
The negative case is more tricky. Implementing b[n] + (a[n] - b[n]) requires routing that effect racks can’t do. You could produce b twice, but having to update the every parameter twice (or being limited to the effect rack’s macro controls) is a huge pain. Instead, I use the side chain from some of Ableton’s effects, which can capture audio before or after any effect rack. See here for an image, where I’ve used the compressor’s side chain, set to audition, to tap audio from the B chain before inverting it. To use this, we put an effect in the B chain, and everything after the inner effect rack is the difference signal. Collapse the side chain rack and never think about it. This effect’s final utility gain is 100% dry at 0 dB (if the difference signal is left unmodified).
One thing is missing from these: it’s really nice to be able to apply effects to the original signal after we’ve used it to produce a difference signal but before we’ve summed them back together. To do that, put another empty effect rack in the A (positive) or B (negative) chain, and use the side chain audition to tap that rack pre-fx. Now, anything before the emtpy rack gets differenced, and anything after only gets sent to the output.
I think you should figure out recreating this for yourself, or even find your own solution, because keeping track of what signal you’re producing and what needs to be inverted at what point in the signal chain is informative. My early attempts weren’t pretty. But if you’d rather just use mine, here’s Difference (Positive) and Difference (Negative) (Live 10. I don’t know if these things are backwards compatible, but I don’t use any features that are 10 only).
-
The process for finding the frequency content of a signal, the fourier transform, is linear. ↩︎
-
One thing I’m taking for granted here is that plugins correctly report the delay they introduce to the signal chain. It’s hard to write a compressor people want to use without knowing exactly how much delay you’re inserting into the signal chain, but equalisers and filters can introduce frequency-specific delays. I couldn’t say how common or uncommon it is for plugins to handle this properly. All this still works, but the difference signal contains information you don’t want it to contain. Then again, if a filter is messing with the phase of your audio, it’s already screwing up your audio! You don’t care about theoretical correctness if you’re still using that filter. ↩︎